As many of you know, Flaskr -- a mini-blog-like-app -- is the app that you build for the official Flask tutorial. I've gone through the tutorial more times than I care to admit. Anyway, I wanted to take the tutorial a step further by adding Test-Driven Development (TDD), a bit of JavaScript, and deployment. This article is that tutorial. Enjoy.
Also, if you're completely new to Flask and/or web development in general, it's important to grasp these basic fundamental concepts:
- The difference between HTTP GET and POST requests and how functions within the app handle each.
- What HTTP "requests" and "responses" are.
- How HTML pages are rendered and/or returned to the end user.
This project is powered by TestDriven.io. Please support this open source project by purchasing one of our Flask courses. Learn how to build, test, and deploy microservices powered by Docker, Flask, and React!
You'll be building a simple blogging app in this tutorial:

This tutorial was last updated on October 17th, 2023:
-
10/17/2023:
- Updated to Python 3.12.0 and bumped all other dependencies.
-
06/03/2022:
- Updated to Python 3.10.4 and bumped all other dependencies.
- 10/14/2020:
-
11/05/2019:
- Updated to Python 3.8.0, Flask 1.1.1, and Bootstrap 4.3.1.
- Replaced jQuery with vanilla JavaScript.
- Added Black and Flake8.
- Used Postgres in production.
- Restricted post delete requests.
- 10/07/2018: Updated to Python 3.7.0.
- 05/10/2018: Updated to Python 3.6.5, Flask 1.0.2, Bootstrap 4.1.1.
-
10/16/2017:
- Updated to Python 3.6.2.
- Updated to Bootstrap 4.
- 10/10/2017: Added a search feature.
- 07/03/2017: Updated to Python 3.6.1.
- 01/24/2016: Updated to Python 3 (v3.5.1)!
- 08/24/2014: PEP8 updates.
- 02/25/2014: Upgraded to SQLAlchemy.
- 02/20/2014: Completed AJAX.
- 12/06/2013: Added Bootstrap 3 styles
- 11/29/2013: Updated unit tests.
- 11/19/2013: Fixed typo. Updated unit tests.
- 11/11/2013: Added information on requests.
- Test Driven Development?
- Download Python
- Project Setup
- First Test
- Flaskr Setup
- Second Test
- Database Setup
- Templates and Views
- Add Some Style
- JavaScript
- Deployment
- Bootstrap
- SQLAlchemy
- Search Page
- Login Required
- Postgres Heroku
- Linting and Code Formatting
- Conclusion
This tutorial utilizes the following requirements:
- Python v3.12.0
- Flask v3.0.0
- Flask-SQLAlchemy v3.1.1
- Gunicorn v21.2.0
- Psycopg2 v2.9.9
- Flake8 v6.1.0
- Black v23.10.0
- pytest v7.4.2
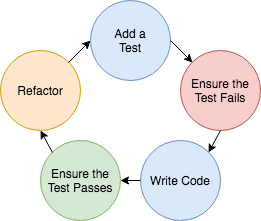
Test-Driven Development (TDD) is an iterative development cycle that emphasizes writing automated tests before writing the actual feature or function. Put another way, TDD combines building and testing. This process not only helps ensure correctness of the code -- but also helps to indirectly evolve the design and architecture of the project at hand.
TDD usually follows the "Red-Green-Refactor" cycle, as shown in the image above:
- Write a test
- Run the test (it should fail)
- Write just enough code for the test to pass
- Refactor code and retest, again and again (if necessary)
For more, check out What is Test-Driven Development?.
Before beginning make sure you have the latest version of Python 3.12 installed, which you can download from http://www.python.org/download/.
This tutorial uses Python v3.12.0.
Along with Python, the following tools are also installed:
- pip - a package management system for Python, similar to gem or npm for Ruby and Node, respectively.
- venv - used to create isolated environments for development. This is standard practice. Always, always, ALWAYS utilize virtual environments. If you don't, you'll eventually run into problems with dependency conflicts.
Feel free to swap out virtualenv and Pip for Poetry or Pipenv. For more, review Modern Python Environments.
Create a new directory to store the project:
$ mkdir flaskr-tdd
$ cd flaskr-tdd
Create and activate a virtual environment:
$ python3.12 -m venv env
$ source env/bin/activate
(env)$
You know that you're in a virtual environment when
envis displayed before the$in your terminal:(env)$. To exit the virtual environment, use the commanddeactivate. You can reactivate by navigating back to the project directory and runningsource env/bin/activate.
Install Flask with pip:
(env)$ pip install flask==3.0.0Let's start with a simple "hello, world" app.
Create the following files and folders:
├── project
│   ├── __init__.py
│   ├── app.py
└── tests
    ├── __init__.py
    └── app_test.py
While the Python standard library comes with a unit testing framework called ùnittest, pytest is the go-to testing framework for testing Python code.
For more on pytest, check out Pytest for Beginners.
Install it:
(env)$ pip install pytest==7.4.2Open tests/app_test.py in your favorite text editor -- like Visual Studio Code, Sublime Text, or PyCharm -- and then add the following code:
from project.app import app


def test_index():
    tester = app.test_client()
    response = tester.get("/", content_type="html/text")

    assert response.status_code == 200
    assert response.data == b"Hello, World!"
Essentially, we're testing whether the response that we get back has a status code of "200" and that "Hello, World!" is displayed.
Run the test:
(env)$ python -m pytestIf all goes well, this test will fail:
ImportError: cannot import name 'app' from 'project.appNow add the code for this to pass to project/app.py:
from flask import Flask


# create and initialize a new Flask app
app = Flask(__name__)


@app.route("/")
def hello():
    return "Hello, World!"


if __name__ == "__main__":
    app.run()
Run the app:
(env)$ FLASK_APP=project/app.py python -m flask run -p 5001The
FLASK_APPenvironment variable is used to tell Flask to look for the application in a different module.
Then, navigate to http://localhost:5001/ in your browser of choice. You should see "Hello, World!" on your screen.
Return to the terminal. Kill the server with Ctrl+C.
Run the test again:
(env)$ python -m pytest

=============================== test session starts ===============================
platform darwin -- Python 3.10.4, pytest-7.4.2, pluggy-1.0.0
rootdir: /Users/michael/repos/github/flaskr-tdd
collected 1 item

tests/app_test.py .                                                         [100%]

================================ 1 passed in 0.10s ================================
Nice.
Essentially, we want to open a database connection, create the database based on a defined schema if it doesn't already exist, and then close the connection each time a test is ran.
Create a new file called schema.sql in "project" and add the following code:
drop table if exists entries;

create table entries (
  id integer primary key autoincrement,
  title text not null,
  text text not null
);
This will set up a single table with three fields: "id", "title", and "text". SQLite will be used for our RDMS since it's part of the standard Python library and requires no configuration.
Update app.py:
from flask import Flask


# configuration
DATABASE = "flaskr.db"

# create and initialize a new Flask app
app = Flask(__name__)

# load the config
app.config.from_object(__name__)


@app.route("/")
def hello():
    return "Hello, World!"


if __name__ == "__main__":
    app.run()
Here, we created a configuration section for config variables (with the name of the future SQLite database) and loaded the config after app initialization.
How do we test for the existence of a file? Update app_test.py like so:
from pathlib import Path

from project.app import app


def test_index():
    tester = app.test_client()
    response = tester.get("/", content_type="html/text")

    assert response.status_code == 200
    assert response.data == b"Hello, World!"


def test_database():
    assert Path("flaskr.db").is_file()
Run it to make sure it fails, indicating that the database does not exist.
Now add the following code to app.py, just before the hello view function:
# connect to database
def connect_db():
    """Connects to the database."""
    rv = sqlite3.connect(app.config["DATABASE"])
    rv.row_factory = sqlite3.Row
    return rv


# create the database
def init_db():
    with app.app_context():
        db = get_db()
        with app.open_resource("schema.sql", mode="r") as f:
            db.cursor().executescript(f.read())
        db.commit()


# open database connection
def get_db():
    if not hasattr(g, "sqlite_db"):
        g.sqlite_db = connect_db()
    return g.sqlite_db


# close database connection
@app.teardown_appcontext
def close_db(error):
    if hasattr(g, "sqlite_db"):
        g.sqlite_db.close()
Add the imports:
import sqlite3

from flask import Flask, g
Curious about
gobject? Check out the Understanding the Application and Request Contexts in Flask for more.
You should now have:
import sqlite3

from flask import Flask, g


# configuration
DATABASE = "flaskr.db"

# create and initialize a new Flask app
app = Flask(__name__)

# load the config
app.config.from_object(__name__)


# connect to database
def connect_db():
    """Connects to the database."""
    rv = sqlite3.connect(app.config["DATABASE"])
    rv.row_factory = sqlite3.Row
    return rv


# create the database
def init_db():
    with app.app_context():
        db = get_db()
        with app.open_resource("schema.sql", mode="r") as f:
            db.cursor().executescript(f.read())
        db.commit()


# open database connection
def get_db():
    if not hasattr(g, "sqlite_db"):
        g.sqlite_db = connect_db()
    return g.sqlite_db


# close database connection
@app.teardown_appcontext
def close_db(error):
    if hasattr(g, "sqlite_db"):
        g.sqlite_db.close()


@app.route("/")
def hello():
    return "Hello, World!"


if __name__ == "__main__":
    app.run()
Now, create a database by starting up a Python shell and importing and then calling the init_db function:
>>> from project.app import init_db
>>> init_db()
Close the shell, then run the test again. Does it pass? It should. Now we know that the database has been created.
You can also call init_db within the test, to ensure that the test can be ran independently:
from pathlib import Path

from project.app import app, init_db


def test_index():
    tester = app.test_client()
    response = tester.get("/", content_type="html/text")

    assert response.status_code == 200
    assert response.data == b"Hello, World!"


def test_database():
    init_db()
    assert Path("flaskr.db").is_file()
Updated structure:
├── flaskr.db
├── project
│   ├── __init__.py
│   ├── app.py
│   └── schema.sql
└── tests
    ├── __init__.py
└── app_test.pyNext, we need to set up the templates and the associated views, which define the routes. Think about this from a user's standpoint:
- Users should be able to log in and out.
- Once logged in, users should be able to post new messages.
- Finally, users should be able to view the messages.
Write some tests for this first.
Take a look at the final code below. I added docstrings for explanation.
import os
import pytest
from pathlib import Path
from project.app import app, init_db
TEST_DB = "test.db"
@pytest.fixture
def client():
BASE_DIR = Path(__file__).resolve().parent.parent
app.config["TESTING"] = True
app.config["DATABASE"] = BASE_DIR.joinpath(TEST_DB)
init_db() # setup
yield app.test_client() # tests run here
init_db() # teardown
def login(client, username, password):
"""Login helper function"""
return client.post(
"/login",
data=dict(username=username, password=password),
follow_redirects=True,
)
def logout(client):
"""Logout helper function"""
return client.get("/logout", follow_redirects=True)
def test_index(client):
response = client.get("/", content_type="html/text")
assert response.status_code == 200
def test_database(client):
"""initial test. ensure that the database exists"""
tester = Path("test.db").is_file()
assert tester
def test_empty_db(client):
"""Ensure database is blank"""
rv = client.get("/")
assert b"No entries yet. Add some!" in rv.data
def test_login_logout(client):
"""Test login and logout using helper functions"""
rv = login(client, app.config["USERNAME"], app.config["PASSWORD"])
assert b"You were logged in" in rv.data
rv = logout(client)
assert b"You were logged out" in rv.data
rv = login(client, app.config["USERNAME"] + "x", app.config["PASSWORD"])
assert b"Invalid username" in rv.data
rv = login(client, app.config["USERNAME"], app.config["PASSWORD"] + "x")
assert b"Invalid password" in rv.data
def test_messages(client):
"""Ensure that user can post messages"""
login(client, app.config["USERNAME"], app.config["PASSWORD"])
rv = client.post(
"/add",
data=dict(title="<Hello>", text="<strong>HTML</strong> allowed here"),
follow_redirects=True,
)
assert b"No entries here so far" not in rv.data
assert b"<Hello>" in rv.data
assert b"<strong>HTML</strong> allowed here" in rv.dataTake note of the client function. This is a pytest fixture, which sets up a known state for each test function before the test runs.
Run the tests now:
(env)$ python -m pytestThree tests should fail:
=============================== test session starts ===============================
platform darwin -- Python 3.10.4, pytest-7.4.2, pluggy-1.0.0
rootdir: /Users/michael/repos/github/flaskr-tdd
collected 5 items

tests/app_test.py ..FFF                                                     [100%]

==================================== FAILURES =====================================
__________________________________ test_empty_db __________________________________

client = <FlaskClient <Flask 'project.app'>>

    def test_empty_db(client):
        """Ensure database is blank"""
        rv = client.get("/")
>       assert b"No entries yet. Add some!" in rv.data
E       AssertionError: assert b'No entries yet. Add some!' in b'Hello, World!'
E        +  where b'Hello, World!' = <WrapperTestResponse 13 bytes [200 OK]>.data

tests/app_test.py:49: AssertionError
________________________________ test_login_logout ________________________________

client = <FlaskClient <Flask 'project.app'>>

    def test_login_logout(client):
        """Test login and logout using helper functions"""
>       rv = login(client, app.config["USERNAME"], app.config["PASSWORD"])
E       KeyError: 'USERNAME'

tests/app_test.py:54: KeyError
__________________________________ test_messages __________________________________

client = <FlaskClient <Flask 'project.app'>>

    def test_messages(client):
        """Ensure that user can post messages"""
>       login(client, app.config["USERNAME"], app.config["PASSWORD"])
E       KeyError: 'USERNAME'

tests/app_test.py:66: KeyError
============================= short test summary info =============================
FAILED tests/app_test.py::test_empty_db -
    AssertionError: assert b'No entries yet. Add some!' in b'Hello, World!'
FAILED tests/app_test.py::test_login_logout - KeyError: 'USERNAME'
FAILED tests/app_test.py::test_messages - KeyError: 'USERNAME'
=========================== 3 failed, 2 passed in 0.17s ==========================
Let's get these all green, one at a time...
First, replace the hello view with the following view function for displaying the entries to app.py:
@app.route('/')
def index():
    """Searches the database for entries, then displays them."""
    db = get_db()
    cur = db.execute('select * from entries order by id desc')
    entries = cur.fetchall()
    return render_template('index.html', entries=entries)
Import in render_template:
from flask import Flask, g, render_templateThen, create a new folder called "templates" inside of "project", and add an index.html template file to it:
<!DOCTYPE html>
<html>
  <head>
    <title>Flaskr</title>
    <link
      rel="stylesheet"
      type="text/css"
      href="{{ url_for('static', filename='style.css') }}"
    />
  </head>
  <body>
    <div class="page">
      <h1>Flaskr-TDD</h1>

      <div class="metanav">
        {% if not session.logged_in %}
        <a href="{{ url_for('login') }}">log in</a>
        {% else %}
        <a href="{{ url_for('logout') }}">log out</a>
        {% endif %}
      </div>

      {% for message in get_flashed_messages() %}
      <div class="flash">{{ message }}</div>
      {% endfor %} {% block body %}{% endblock %} {% if session.logged_in %}
      <form
        action="{{ url_for('add_entry') }}"
        method="post"
        class="add-entry"
      >
        <dl>
          <dt>Title:</dt>
          <dd><input type="text" size="30" name="title" /></dd>
          <dt>Text:</dt>
          <dd><textarea name="text" rows="5" cols="40"></textarea></dd>
          <dd><input type="submit" value="Share" /></dd>
        </dl>
      </form>
      {% endif %}

      <ul class="entries">
        {% for entry in entries %}
        <li>
          <h2>{{ entry.title }}</h2>
          {{ entry.text|safe }}
        </li>
        {% else %}
        <li><em>No entries yet. Add some!</em></li>
        {% endfor %}
      </ul>
    </div>
  </body>
</html>Update app.py:
@app.route('/login', methods=['GET', 'POST'])
def login():
    """User login/authentication/session management."""
    error = None
    if request.method == 'POST':
        if request.form['username'] != app.config['USERNAME']:
            error = 'Invalid username'
        elif request.form['password'] != app.config['PASSWORD']:
            error = 'Invalid password'
        else:
            session['logged_in'] = True
            flash('You were logged in')
            return redirect(url_for('index'))
    return render_template('login.html', error=error)


@app.route('/logout')
def logout():
    """User logout/authentication/session management."""
    session.pop('logged_in', None)
    flash('You were logged out')
    return redirect(url_for('index'))
In the above login function, the decorator indicates that the route can accept either a GET or POST request. Put simply, a request is initiated by the end user when they access the /login URL. The difference between these requests is simple: GET is used for accessing a webpage, while POST is used when information is sent to the server. Thus, when a user accesses the /login URL, they are using a GET request, but when they attempt to log in, a POST request is used.
Update the config as well:
# configuration
DATABASE = "flaskr.db"
USERNAME = "admin"
PASSWORD = "admin"
SECRET_KEY = "change_me"
Add the appropriate imports:
from flask import Flask, g, render_template, request, session, flash, redirect, url_forAdd the login.html template:
<!DOCTYPE html>
<html>
  <head>
    <title>Flaskr-TDD | Login</title>
    <link
      rel="stylesheet"
      type="text/css"
      href="{{ url_for('static', filename='style.css') }}"
    />
  </head>
  <body>
    <div class="page">
      <h1>Flaskr</h1>

      <div class="metanav">
        {% if not session.logged_in %}
        <a href="{{ url_for('login') }}">log in</a>
        {% else %}
        <a href="{{ url_for('logout') }}">log out</a>
        {% endif %}
      </div>

      {% for message in get_flashed_messages() %}
      <div class="flash">{{ message }}</div>
      {% endfor %} {% block body %}{% endblock %}

      <h2>Login</h2>

      {% if error %}
      <p class="error"><strong>Error:</strong> {{ error }}</p>
      {% endif %}

      <form action="{{ url_for('login') }}" method="post">
        <dl>
          <dt>Username:</dt>
          <dd><input type="text" name="username" /></dd>
          <dt>Password:</dt>
          <dd><input type="password" name="password" /></dd>
          <dd><input type="submit" value="Login" /></dd>
        </dl>
      </form>
    </div>
  </body>
</html>
Run the tests again. You should see two errors:
E werkzeug.routing.BuildError: Could not build url for endpoint 'add_entry'. Did you mean 'login' instead?Next, add in a view for adding entries:
@app.route('/add', methods=['POST'])
def add_entry():
    """Add new post to database."""
    if not session.get('logged_in'):
        abort(401)
    db = get_db()
    db.execute(
        'insert into entries (title, text) values (?, ?)',
        [request.form['title'], request.form['text']]
    )
    db.commit()
    flash('New entry was successfully posted')
    return redirect(url_for('index'))
Add the appropriate imports:
from flask import Flask, g, render_template, request, session, flash, redirect, url_for, abortRetest:
=============================== test session starts ===============================
platform darwin -- Python 3.10.4, pytest-7.4.2, pluggy-1.0.0
rootdir: /Users/michael/repos/github/flaskr-tdd
collected 5 items

tests/app_test.py .....                                                     [100%]

================================ 5 passed in 0.16s ================================
Perfect.
Save the following styles to a new file called style.css in a new folder called "project/static":
body {
  font-family: sans-serif;
  background: #eee;
}

a,
h1,
h2 {
  color: #377ba8;
}

h1,
h2 {
  font-family: "Georgia", serif;
  margin: 0;
}

h1 {
  border-bottom: 2px solid #eee;
}

h2 {
  font-size: 1.2em;
}

.page {
  margin: 2em auto;
  width: 35em;
  border: 5px solid #ccc;
  padding: 0.8em;
  background: white;
}

.entries {
  list-style: none;
  margin: 0;
  padding: 0;
}

.entries li {
  margin: 0.8em 1.2em;
}

.entries li h2 {
  margin-left: -1em;
}

.add-entry {
  font-size: 0.9em;
  border-bottom: 1px solid #ccc;
}

.add-entry dl {
  font-weight: bold;
}

.metanav {
  text-align: right;
  font-size: 0.8em;
  padding: 0.3em;
  margin-bottom: 1em;
  background: #fafafa;
}

.flash {
  background: #cee5f5;
  padding: 0.5em;
  border: 1px solid #aacbe2;
}

.error {
  background: #f0d6d6;
  padding: 0.5em;
}
Run your app, log in (username/password = "admin"), add a post, log out.
Next, let's add some JavaScript to make the app slightly more interactive.
Open index.html and update the first <li> like so:
<li class="entry">
  <h2 id="{{ entry.id }}">{{ entry.title }}</h2>
  {{ entry.text|safe }}
</li>
Now, we can use JavaScript to target each <li>. First, we need to add the following script to the document just before the closing body tag:
<script
  type="text/javascript"
  src="{{url_for('static', filename='main.js') }}"
></script>
Create a main.js file in your "static" directory and add the following code:
(function () {
  console.log("ready!"); // sanity check
})();

const postElements = document.getElementsByClassName("entry");

for (var i = 0; i < postElements.length; i++) {
  postElements[i].addEventListener("click", function () {
    const postId = this.getElementsByTagName("h2")[0].getAttribute("id");
    const node = this;
    fetch(`/delete/${postId}`)
      .then(function (resp) {
        return resp.json();
      })
      .then(function (result) {
        if (result.status === 1) {
          node.parentNode.removeChild(node);
          console.log(result);
        }
        location.reload();
      })
      .catch(function (err) {
        console.log(err);
      });
  });
}
Add a new function in app.py to remove the post from the database:
@app.route('/delete/<post_id>', methods=['GET'])
def delete_entry(post_id):
    """Delete post from database"""
    result = {'status': 0, 'message': 'Error'}
    try:
        db = get_db()
        db.execute('delete from entries where id=' + post_id)
        db.commit()
        result = {'status': 1, 'message': "Post Deleted"}
    except Exception as e:
        result = {'status': 0, 'message': repr(e)}
    return jsonify(result)
Update the imports:
from flask import Flask, g, render_template, request, session, flash, redirect, url_for, abort, jsonifyFinally, add a new test:
def test_delete_message(client):
    """Ensure the messages are being deleted"""
    rv = client.get('/delete/1')
    data = json.loads(rv.data)
    assert data["status"] == 1
Make sure to add the following import as well: import json.
Manually test this out by running the server and adding two new entries. Click on one of them. It should be removed from the DOM as well as the database. Double check this.
Then run your automated test suite. It should pass:
(env)$ python -m pytest

=============================== test session starts ===============================
platform darwin -- Python 3.10.4, pytest-7.4.2, pluggy-1.0.0
rootdir: /Users/michael/repos/github/flaskr-tdd
collected 6 items

tests/app_test.py ......                                                    [100%]

================================ 6 passed in 0.17s ================================With the app in a working state, let's shift gears and deploy the app to Heroku. To do this, first sign up, and then install the Heroku CLI.
Next, install a production-grade WSGI web server called Gunicorn:
(env)$ pip install gunicorn==21.2.0Create a Procfile in the project root:
(env)$ touch ProcfileAnd add the following code:
web: gunicorn project.app:appCreate a requirements.txt file to specify the external dependencies that need to be installed for the app to work:
(env)$ touch requirements.txtAdd the requirements:
Flask==3.0.0
gunicorn==21.2.0
pytest==7.4.2
Create a .gitignore file in the project root:
(env)$ touch .gitignoreAnd include the following files and folders (so they are not included in version control):
env
*.pyc
*.DS_Store
__pycache__
test.db
To specify the correct Python runtime, add a new file to the project root called runtime.txt:
python-3.12.0
Add a local Git repo:
(env)$ git init
(env)$ git add -A
(env)$ git commit -m "initial"
Deploy to Heroku:
(env)$ heroku create
(env)$ git push heroku main
Let's test this in the cloud. Run heroku open to open the app in your default web browser.
Let's update the styles with Bootstrap.
First, remove the style.css stylesheet from both index.html and login.html. Then add this stylesheet to both files:
<link
  rel="stylesheet"
  type="text/css"
  href="https://cdn.jsdelivr.net/npm/bootstrap@5.3.2/dist/css/bootstrap.min.css"
/>
Now, we have full access to all of the Bootstrap helper classes.
Replace the code in login.html with:
<!DOCTYPE html>
<html>
  <head>
    <title>Flaskr-TDD | Login</title>
    <link
      rel="stylesheet"
      type="text/css"
      href="https://cdn.jsdelivr.net/npm/bootstrap@5.3.2/dist/css/bootstrap.min.css"
    />
  </head>
  <body>
    <div class="container">
      <br /><br />
      <h1>Flaskr</h1>
      <br /><br />

      {% for message in get_flashed_messages() %}
      <div class="flash alert alert-success col-sm-4" role="success">
        {{ message }}
      </div>
      {% endfor %}

      <h3>Login</h3>

      {% if error %}
      <p class="alert alert-danger col-sm-4" role="danger">
        <strong>Error:</strong> {{ error }}
      </p>
      {% endif %}

      <form action="{{ url_for('login') }}" method="post" class="form-group">
        <dl>
          <dt>Username:</dt>
          <dd>
            <input
              type="text"
              name="username"
              class="form-control col-sm-4"
            />
          </dd>
          <dt>Password:</dt>
          <dd>
            <input
              type="password"
              name="password"
              class="form-control col-sm-4"
            />
          </dd>
          <br /><br />
          <dd>
            <input type="submit" class="btn btn-primary" value="Login" />
          </dd>
          <span>Use "admin" for username and password</span>
        </dl>
      </form>
    </div>
    <script
      type="text/javascript"
      src="{{url_for('static', filename='main.js') }}"
    ></script>
  </body>
</html>
And replace the code in index.html with:
<!DOCTYPE html>
<html>
  <head>
    <title>Flaskr</title>
    <link
      rel="stylesheet"
      type="text/css"
      href="https://cdn.jsdelivr.net/npm/bootstrap@5.3.2/dist/css/bootstrap.min.css"
    />
  </head>
  <body>
    <div class="container">
      <br /><br />
      <h1>Flaskr</h1>
      <br /><br />

      {% if not session.logged_in %}
      <a class="btn btn-success" role="button" href="{{ url_for('login') }}"
        >log in</a
      >
      {% else %}
      <a class="btn btn-warning" role="button" href="{{ url_for('logout') }}"
        >log out</a
      >
      {% endif %}

      <br /><br />

      {% for message in get_flashed_messages() %}
      <div class="flash alert alert-success col-sm-4" role="success">
        {{ message }}
      </div>
      {% endfor %} {% if session.logged_in %}
      <form
        action="{{ url_for('add_entry') }}"
        method="post"
        class="add-entry form-group"
      >
        <dl>
          <dt>Title:</dt>
          <dd>
            <input
              type="text"
              size="30"
              name="title"
              class="form-control col-sm-4"
            />
          </dd>
          <dt>Text:</dt>
          <dd>
            <textarea
              name="text"
              rows="5"
              cols="40"
              class="form-control col-sm-4"
            ></textarea>
          </dd>
          <br /><br />
          <dd>
            <input type="submit" class="btn btn-primary" value="Share" />
          </dd>
        </dl>
      </form>
      {% endif %}

      <br />

      <ul class="entries">
        {% for entry in entries %}
        <li class="entry">
          <h2 id="{{ entry.id }}">{{ entry.title }}</h2>
          {{ entry.text|safe }}
        </li>
        {% else %}
        <li><em>No entries yet. Add some!</em></li>
        {% endfor %}
      </ul>
    </div>
    <script
      type="text/javascript"
      src="{{url_for('static', filename='main.js') }}"
    ></script>
  </body>
</html>
Run the app locally:
(env)$ FLASK_APP=project/app.py python -m flask run -p 5001Check out the changes in the browser!
Let's upgrade to Flask-SQLAlchemy, in order to better manage the database.
Start by installing Flask-SQLAlchemy:
(env)$ pip install Flask-SQLAlchemy==3.1.1Make sure to add it to your requirements file as well.
Next, add a create_db.py file to the project root. Then, add the following code:
# create_db.py


from project.app import app, db
from project.models import Post


with app.app_context():
    # create the database and the db table
    db.create_all()

    # commit the changes
    db.session.commit()
This file will be used to create our new database. Go ahead and delete the old database file (flaskr.db) along with the project/schema.sql file.
Next, add a project/models.py file, which will be used to generate the new schema:
from project.app import db


class Post(db.Model):
    id = db.Column(db.Integer, primary_key=True)
    title = db.Column(db.String, nullable=False)
    text = db.Column(db.String, nullable=False)

    def __init__(self, title, text):
        self.title = title
        self.text = text

    def __repr__(self):
return f'<title {self.title}>'import sqlite3
from pathlib import Path
from flask import Flask, g, render_template, request, session, \
flash, redirect, url_for, abort, jsonify
from flask_sqlalchemy import SQLAlchemy
basedir = Path(__file__).resolve().parent
# configuration
DATABASE = "flaskr.db"
USERNAME = "admin"
PASSWORD = "admin"
SECRET_KEY = "change_me"
SQLALCHEMY_DATABASE_URI = f'sqlite:///{Path(basedir).joinpath(DATABASE)}'
SQLALCHEMY_TRACK_MODIFICATIONS = False
# create and initialize a new Flask app
app = Flask(__name__)
# load the config
app.config.from_object(__name__)
# init sqlalchemy
db = SQLAlchemy(app)
from project import models
@app.route('/')
def index():
"""Searches the database for entries, then displays them."""
entries = db.session.query(models.Post)
return render_template('index.html', entries=entries)
@app.route('/add', methods=['POST'])
def add_entry():
"""Adds new post to the database."""
if not session.get('logged_in'):
abort(401)
new_entry = models.Post(request.form['title'], request.form['text'])
db.session.add(new_entry)
db.session.commit()
flash('New entry was successfully posted')
return redirect(url_for('index'))
@app.route('/login', methods=['GET', 'POST'])
def login():
"""User login/authentication/session management."""
error = None
if request.method == 'POST':
if request.form['username'] != app.config['USERNAME']:
error = 'Invalid username'
elif request.form['password'] != app.config['PASSWORD']:
error = 'Invalid password'
else:
session['logged_in'] = True
flash('You were logged in')
return redirect(url_for('index'))
return render_template('login.html', error=error)
@app.route('/logout')
def logout():
"""User logout/authentication/session management."""
session.pop('logged_in', None)
flash('You were logged out')
return redirect(url_for('index'))
@app.route('/delete/<int:post_id>', methods=['GET'])
def delete_entry(post_id):
"""Deletes post from database."""
result = {'status': 0, 'message': 'Error'}
try:
db.session.query(models.Post).filter_by(id=post_id).delete()
db.session.commit()
result = {'status': 1, 'message': "Post Deleted"}
flash('The entry was deleted.')
except Exception as e:
result = {'status': 0, 'message': repr(e)}
return jsonify(result)
if __name__ == "__main__":
app.run()Notice the changes in the config at the top as well since the means in which we're now accessing and manipulating the database in each view function -- via SQLAlchemy instead of vanilla SQL.
Run the following command to create the initial database:
(env)$ python create_db.pyFinally, update the client fixture in the tests:
@pytest.fixture
def client():
    BASE_DIR = Path(__file__).resolve().parent.parent
    app.config["TESTING"] = True
    app.config["DATABASE"] = BASE_DIR.joinpath(TEST_DB)
    app.config["SQLALCHEMY_DATABASE_URI"] = f"sqlite:///{BASE_DIR.joinpath(TEST_DB)}"

    with app.app_context():
        db.create_all()  # setup
        yield app.test_client()  # tests run here
        db.drop_all()  # teardown
Update the imports as well:
from project.app import app, dbEnsure the tests pass:
(env)$ python -m pytest

=============================== test session starts ===============================
platform darwin -- Python 3.10.4, pytest-7.4.2, pluggy-1.0.0
rootdir: /Users/michael/repos/github/flaskr-tdd
collected 6 items

tests/app_test.py ......                                                    [100%]

================================ 6 passed in 0.34s ================================
Manually test the app as well by running the server and logging in and out, adding new entries, and deleting old entries.
If all is well, Update the requirements file:
Flask==3.0.0
Flask-SQLAlchemy==3.1.1
gunicorn==21.2.0
pytest==7.4.2
Commit your code, and then push the new version to Heroku!
Let's add a search page. It will be a nice feature that will come in handy after we have a number of posts.
@app.route('/search/', methods=['GET'])
def search():
    query = request.args.get("query")
    entries = db.session.query(models.Post)
    if query:
        return render_template('search.html', entries=entries, query=query)
    return render_template('search.html')
Be sure to write a test for this on your own!
In the "templates" folder create a new file called search.html:
(env)$ touch search.htmlNow add the following code to search.html:
<!DOCTYPE html>
<html>
  <head>
    <title>Flaskr</title>
    <link
      rel="stylesheet"
      type="text/css"
      href="https://cdn.jsdelivr.net/npm/bootstrap@5.3.2/dist/css/bootstrap.min.css"
    />
  </head>
  <body>
    <div class="container">
      <br /><br />
      <h1>Flaskr</h1>
      <br /><br />

      <a class="btn btn-primary" role="button" href="{{ url_for('index') }}">
        Home
      </a>

      {% if not session.logged_in %}
      <a class="btn btn-success" role="button" href="{{ url_for('login') }}"
        >log in</a
      >
      {% else %}
      <a class="btn btn-warning" role="button" href="{{ url_for('logout') }}"
        >log out</a
      >
      {% endif %}

      <br /><br />

      {% for message in get_flashed_messages() %}
      <div class="flash alert alert-success col-sm-4" role="success">
        {{ message }}
      </div>
      {% endfor %}

      <form action="{{ url_for('search') }}" method="get" class="from-group">
        <dl>
          <dt>Search:</dt>
          <dd>
            <input type="text" name="query" class="form-control col-sm-4" />
          </dd>
          <br />
          <dd><input type="submit" class="btn btn-info" value="Search" /></dd>
        </dl>
      </form>

      <ul class="entries">
        {% for entry in entries %} {% if query.lower() in entry.title.lower() or
        query.lower() in entry.text.lower() %}
        <li class="entry">
          <h2 id="{{ entry.post_id }}">{{ entry.title }}</h2>
          {{ entry.text|safe }}
        </li>
        {% endif %} {% endfor %}
      </ul>
    </div>
    <script
      type="text/javascript"
      src="{{url_for('static', filename='main.js') }}"
    ></script>
  </body>
</html>Add a search button for better navigation just below <h1>Flaskr</h1>:
<a class="btn btn-info" role="button" href="{{ url_for('search') }}">Search</a>Test it out locally. If all is well, commit your code and update the version on Heroku.
Currently, posts can be deleted by anyone. Let's change that so one has to be logged in before they can delete a post.
Add the following decorator to app.py:
def login_required(f):
    @wraps(f)
    def decorated_function(*args, **kwargs):
        if not session.get('logged_in'):
            flash('Please log in.')
            return jsonify({'status': 0, 'message': 'Please log in.'}), 401
        return f(*args, **kwargs)
    return decorated_function
Don't forget the import:
from functools import wrapsBe sure to write tests for this on your own!
Next, add the decorator to the delete_entry view:
@app.route('/delete/<int:post_id>', methods=['GET'])
@login_required
def delete_entry(post_id):
    """Deletes post from database."""
    result = {'status': 0, 'message': 'Error'}
    try:
        new_id = post_id
        db.session.query(models.Post).filter_by(id=new_id).delete()
        db.session.commit()
        result = {'status': 1, 'message': "Post Deleted"}
        flash('The entry was deleted.')
    except Exception as e:
        result = {'status': 0, 'message': repr(e)}
    return jsonify(result)
Update the test:
def test_delete_message(client):
    """Ensure the messages are being deleted"""
    rv = client.get("/delete/1")
    data = json.loads(rv.data)
    assert data["status"] == 0
    login(client, app.config["USERNAME"], app.config["PASSWORD"])
    rv = client.get("/delete/1")
    data = json.loads(rv.data)
    assert data["status"] == 1
Test it out locally again. If all is well, commit your code and update the version on Heroku.
SQLite is a great database to use in order to get an app up and running quickly. That said, it's not intended to be used as a production grade database. So, let's move to using Postgres on Heroku.
Start by provisioning a new mini plan Postgres database:
(env)$ heroku addons:create heroku-postgresql:miniOnce created, the database URL can be access via the DATABASE_URL environment variable:
(env)$ heroku configYou should see something similar to:
=== glacial-savannah-72166 Config Vars

DATABASE_URL: postgres://zebzwxlootewbx:da5c19a66cd4765dd39aed40abb06dff10682c3213501695c4b98612de0dfac9@ec2-54-208-11-146.compute-1.amazonaws.com:5432/d77tnmeavvasm0
Next, update the SQLALCHEMY_DATABASE_URI variable in app.py like so:
url = os.getenv('DATABASE_URL', f'sqlite:///{Path(basedir).joinpath(DATABASE)}')

if url.startswith("postgres://"):
    url = url.replace("postgres://", "postgresql://", 1)

SQLALCHEMY_DATABASE_URI = url
So, SQLALCHEMY_DATABASE_URI now uses the value of the DATABASE_URL environment variable if it's available. Otherwise, it will use the SQLite URL.
Make sure to import os:
import osRun the tests to ensure they still pass:
(env)$ python -m pytest

=============================== test session starts ===============================
platform darwin -- Python 3.10.4, pytest-7.4.2, pluggy-1.0.0
rootdir: /Users/michael/repos/github/flaskr-tdd
collected 6 items

tests/app_test.py ......                                                    [100%]

================================ 6 passed in 0.32s ================================
Try logging in and out, adding a few new entries, and deleting old entries locally.
Before updating Heroku, add Psycopg2 -- a Postgres database adapter for Python -- to the requirements file:
Flask==3.0.0
Flask-SQLAlchemy==3.1.1
gunicorn==21.2.0
psycopg2-binary==2.9.9
pytest==7.4.2
Commit and push your code up to Heroku.
Snce we're using a new database on Heroku, you'll need to run the following command once to create the tables:
(env)$ heroku run python create_db.pyTest things out.
Finally, we can lint and auto format our code with Flake8 and Black, respectively:
(env)$ pip install flake8==6.1.0
(env)$ pip install black==23.10.0
Run Flake8 and correct any issues:
(env)$ python -m flake8 --exclude env --ignore E402,E501 .

./create_db.py:5:1: F401 'project.models.Post' imported but unused
./tests/app_test.py:2:1: F401 'os' imported but unused
./project/app.py:2:1: F401 'sqlite3' imported but unused
./project/app.py:6:1: F401 'flask.g' imported but unused
./project/app.py:7:19: E126 continuation line over-indented for hanging indent
Update the code formatting per Black:
$ python -m black --exclude=env .

reformatted /Users/michael/repos/github/flaskr-tdd/project/models.py
reformatted /Users/michael/repos/github/flaskr-tdd/project/app.py
All done! ✨ 🍰 ✨
2 files reformatted, 4 files left unchanged.
Test everything out once last time!
- Want my code? Grab it here.
- Want more Flask fun? Check out TestDriven.io. Learn how to build, test, and deploy microservices powered by Docker, Flask, and React!
- Want something else added to this tutorial? Add an issue to the repo.
